Welcome to the blogpost supporting the AWS re:Invent 2024 session “DEV335 – The modern CI/CD toolbox: Strategies for consistency and reliability”.
We aim to not only summerize but also enhance your session experience with this blog post.
Please do not hesitate to reach out and ask any questions that you might have in the comments or reach out to us directly on socials.
If you’re an old-school person, reach out to us by eMail.
Session walk-through and contents
CI/CD foundations
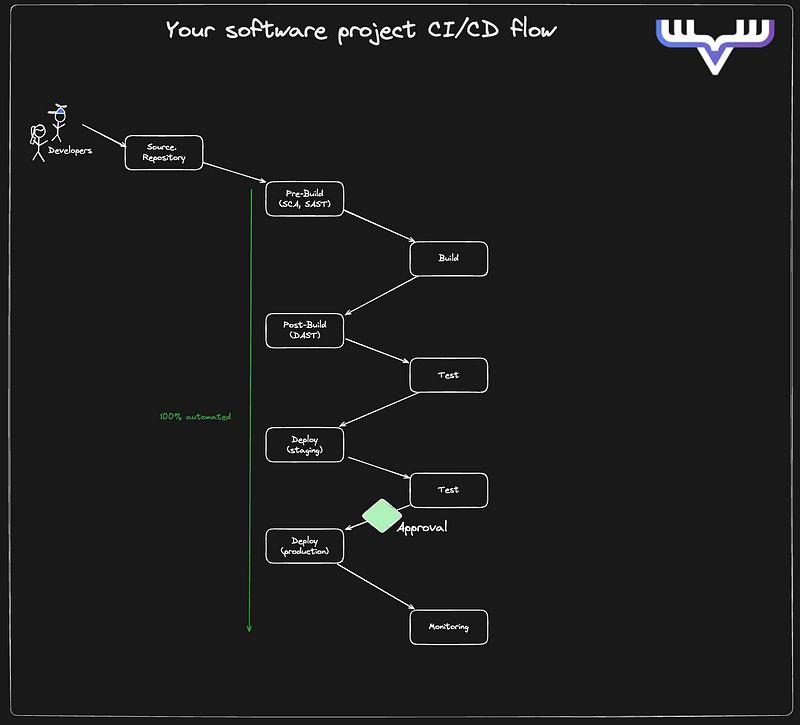
Continuous integration (CI) involves developers merging code changes frequently, ensuring that the cumulative code is tested regularly—preferably multiple times a day. Continuous delivery (CD), on the other hand, requires manual approval before deploying to production, while continuous deployment is entirely automated.
Unified CI/CD pipelines
Thorsten emphasized the importance of having a single, unified pipeline for all kinds of changes—whether they are application code updates, infrastructure modifications, or configuration changes. This helps maintain consistency, reduces risks, and simplifies compliance.
Code signing and attestation
According to Gunnar, ensuring the integrity of the code through signing and artifact attestation is paramount. This practice verifies that the code hasn’t been altered improperly, tracing each change back to a trusted source, which significantly reduces the risk of tampering and supply chain attacks.
GitOps: a new look at operations
Johannes took an in-depth look into how GitOps integrates Git with operations, streamlining deployment decision-making. GitOps supports a fast, automated transition into production environments without manual intervention, making it powerful for Kubernetes and other cloud-native projects. The main takeway is that with implementing GitOps, the decision to deploy a change to production is taken by the team members close to the context of the change instead of being taken by a “Change Advisory Board” or managers that are far away from the actual change.
Deployment strategies for minimizing risks
Several deployment strategies, including rolling deployments, blue-green deployments, and canary deployments, were outlined by Gunnar. Each strategy offers a different balance of speed and risk, with options to revert back to previous versions quickly if issues arise. You will need to choose the strategy the fits your business needs and your applications requirements.
Drift – Avoid it at any option
In this section, Johannes highlighted the challenges that come around with “Drift” in deployments – which is defined as any kind of manual changes that are done in your cloud deployment without going through Infrastructure as Code (IaC) and CI/CD. We gave the guidance to ensure that noone should get access to the target account to perform manual changes, instead, you should implement a “break-glass” pipeline that is focused on speed to recover form application downtime by rolling forward through CI/CD.
Ensuring consistency across pipelines
Torsten introduced an innovative approach to maintaining pipeline consistency using constructs. By centralizing the standard pipeline templates and allowing teams to extend them, organizations can adapt to specific needs without sacrificing consistency. This method also assists in managing migration between various CI/CD platforms effectively.
The role of security and compliance
Security and compliance are non-negotiable, integral parts of any CI/CD process. Integrating these practices from the beginning ensures that both security and compliance standards are maintained throughout the development lifecycle.
Feature flags and progressive delivery
Gunnar highlighted the importance of feature flags and progressive delivery in decoupling deployment from feature activation. With feature flags, changes can be made dynamically without redeployment, enhancing agility and reducing risk. This approach, used by companies like Netflix, enables controlled risk management and early detection of issues.
Avoiding vendor lock-in with projen-pipelines
Thorsten presented a possibility for CI/CD practicioners to adapt an open source project called projen-pipelines that empowers developers to switch between different CI/CD vendoers by allowing to define the pipelines in Typescript and implementing a renderer process that is able to generate pipeline code for Gitlab, Github, CodeCatalyst and bash.
Conclusions
The insights from this session highlighted the ever-evolving nature of CI/CD practices, where automation, innovation, and stringent security measures play crucial roles. As we continue to refine these practices, it’s clear that the right blend of technology and methodology can significantly impact the efficiency and reliability of software delivery processes.
Next steps
To dive deeper into these strategies, check out the resources and links provided below. Engage with the wider community to exchange ideas and best practices, and continue evolving your CI/CD processes to meet future challenges.
Thank you for attending this session and for taking the time to read the additional information provided here.
Please do not hesitate to reach out and ask any questions that you might have in the comments or reach out to us directly on socials.
If you’re an old-school person, reach out to us by eMail.
A few weeks ago AWS CodeCommit became a deprecated service on AWS. This means, customers cannot create new repositories anymore – refer to this announcement for all details: Blog for CodeCommit
There are obviously a lot of alternatives to CodeCommit (Github, Gitlab, …) but if you need a “self-hosted” Git repository in your own AWS account this can become a little bit harder to provision.
If you’re looking for a “self-hosted” Git server, a bunch of tools come up:
…and obviously also others or just a “git” server running on EC2
As I wanted to be able to deploy something that works “out of the box” I looked at how to provision one of these alternatives on my own AWS account.
Gitness
Gitness is an open source development platform packed with the power of code hosting and automated DevOps pipelines. It’s biggest mantainer is Harness. It includes “way more” than just Git – eg Gitspaces, Pipelines, etc.
Deployment of Gitness
If you want to deploy Gitness, the docs point you at running it locally using Docker, or by deploying it on EC2 or k8s.
My aim was to “only” make the “Git” component available and because of that I’ve chosen Amazon ECS with EFS as storage to provision Gitness.
Open Source Code for the deployment of Gitness
I’ve set up a project on Github where all of the code examples are available for you to look at:
I am personally using CodeCatalyst regularly for a lot of private projects, I also work a lot with other users of CodeCatalyst and I give feedback to the CodeCatalyst team regularly. In this post I look at the state of the tool in July 2024 and about how I make use of it on a regular basis.
A few more months in…
CodeCatalyst has been officially announced in december 2022 and reached GA in april 2023. Since then, it has been getting a lot of updates and changes, some of them you’ve potentially never had a look on.
In december 2023, major updates for enterprise customers were announced alongside other features like packages and Amazon Q integration functionalities.
CodeCatalyst also announced the possibility to expand packages usage to other providers than just npm – you are now also able to store maven based artifacts or OCI based images in packages.
Major updates to custom blueprints and additional blueprints allow and anble you to on the onside import source code into CodeCatalyst and on the other side to create a custom blueprint out of an existing project. This should make creating blueprints more accessible.
For a few months it has also been possible to include “approval gates” in CodeCatalyst workflows. This is a very limited functionality, but it still allows some important use cases.
Is CodeCatalyst ready for prime time?
It still depends.
While CodeCatalyst has drastically improved and matured over the last 12 months, there are still a few things that need to get better before I would 100% recommend you to use it.
Things that mainly concern me as of now: CI/CD capabilities and integration with AWS services.
The CI/CD capabilities are still limited and need to be improved to be more flexible and integrated. Approval rules need to be more sophisticated and allow some more specification.
If you already have CI/CD workflows or branch permissions set up in a tool of your choice, having “import” functionalities that translate existing Github Actions, Jenkins pipelines or Gitlab workflows into CodeCatalyst workflows is missing as well as the option to automatically set up branch permissions.
Other than that, CodeCatalyst is pretty much ready to be used for prime time and it has some functionalities that are outstanding and should be marketted more.
Next steps? What I think could come next…
The brave option
I still believe that that most underrated functionalitiy of CodeCatalyst is the Custom Blueprints functionality. If you’re living in a k8s world, Backstage has been leading, together with others, the field of “Internal Developer Portals” that empower developers perform actions quicker and more eficient in their day to day live. Especially Backstage starts with the possibility of scaffolding projects and generating code. However, Backstage does not allow you to keep track of changes to the relevant templates later.
Custom Blueprints – and also “existing Blueprints” do empower developers to do exactly the same thing.
Given CodeCatalyst has already been opening itself with other third party integrations like allowing a full Github, Gitlab and Bitbucket integration, I can see a potential of opening CodeCatalyst up even further.
With the given and already available marketplace in CodeCatalyst – that is not yet used very much – this could be opened up to allow other providers to add additional integrations, actions, blue prints.
Still the team would need to add additional functionalities like dashboards, widgets, … to make CodeCatalyst like an “Internal Developer Portal”.
What is unclear to me is whether AWS will be brave enough to perform another 1-2 years of investment into CodeCatalyst before it can become the central place for developers on AWS. I am also not sure AWS will finally go All-In on CodeCatalyst or if they will continue to invest into the existing Code* tools (CodeCommit/CodePipeline/CodeBuild/CodeArtifact).
The usual way for AWS developer tools
AWS will continue to invest half-focused and try to stay “on track” to help a huge customer base to achieve the simple things with CodeCatalyst. Integrations to other AWS services will be missed, the adoption rate will be small. With this kind of investment, AWS will have multiple solutions of Developer Tools (CodeCatalyst vs. CodeCommit/CodePipeline/CodeBuild/CodeArtifact) in the portfolio that both do not solve “all” problems and usecases but serve different customer bases.
What I think will happen
Give CodeCatalyst is build in different service teams we will see some teams heavily investing into making “their” part of the product successful (e.g. “Packages”, “CI/CD” or “Amazon Q in CodeCatalyst”). We will start seing these unique capabilities reach other parts of AWS services or potentially also other platforms. CodeCatalyst as a product will continue to exist but the different service teams will start to focus on where they can make more “money”. CodeCatalyst will not be able to deliver the promise it had when it was announced as the “central place for DevOps teams on AWS”. CodeCatalyst functionalities will be made available through the AWS console. With that, CodeCatalyst as “the product” that I was hoping for will cease to exist.
What do you think about my ideas and assumptions? Do you think I am wrong?
Drop me a comment or a note, I’d love to hear what your take on the future of CodeCatalyst is!
In this post we’re going to look at the new functionalities that have been added to Application Composer
In this post we’re going to look at the new functionalities that have been added to Application Composer by re:Invent 2023. After announcing the support of all CloudFormation resources earlier in the year, Application Composer now allows editing StepFunctions within the same user interface and – even cooler – announces the integration of an IDE plugin that allows developers to build serverless functions locally.
Application Composer as a serverless, rapid prototyping service adds additional capabilities to empower developers building serverless applications
Application Composer, that was originally announced last year at re:Invent 2022, has gotten a lot of major improvements thoughout 2023. As we are right at re:Invent 2023, its time to look back on which new capabilities have been added and how they influence building serverless applications using AppComposer.
Supporting all CloudFormation resouces
Already a few weeks ago the team announced that all over 1000 CloudFormation resources are now supported by AppComposer. This really gave a big update and make it simpler to build all kind of serverless applications. However, as this only alled AppComposer to expose the resources, this still requires the developer to know all required connections between the different resources. I personally would love to get more “supported” resources (just like L2 resources in CDK) to be made available as part of AppComposer. I would hope that this will be an additional functionality soon.
Integrating additional services
With the integration of the Stepfunctions Workflow Studio within the same interface, developers can now build and end to end application within composer before using the generated SAM or CDK templates to trigger the deployment. As a next step I think it would be great to also be able to define Eventbridge Rules & Pipes within the same interface.
Local development and IDE integration
AppComposer announced a Visual Studio Code integration that makes it possible to build and design serverless applications right from your IDE!
With this feature, you can visualize your serverless applications without being within your browser or the AWS console – start building, whereever you are and whenever you want!
I have not been able to try out this functionality yet, but especially the integration with sam connect that allows to also directly deploy the changes you made to your picture / template will make a big different in building applications using AppComposer.
Also I think we should not underestimate the possibility that this offers to vizualize existing CloudFormation templates through either the IDE plugin or the AWS Console. This will help to explain big and difficult already existing applications and empowers teams to have a fruitful conversation about changes they would like to implement in existing templates, as have a visualization makes the conversation easier.
What’s next for Application Composer? What are my wishes?
Already last year I have asked to integrate AppComposer in CodeCatalyst and I believe that this would be an awesome possibility to quickly start serverless projects. Application Composer today feels like a playground – to make the service more usable, it needs to have a “deployment” component that allows you to automate the lifecycle of your serverless application (including a full CI/CD pipeline).
I also last year asked for creation of CDK out of Application Composer – or even importing it – but instead of investing into that direction AWS recently announced the existance of the CDK Builder Tool – wouldn’t it be better to merge those initiatives together?
As already mentioned above, supporting additional “CDK-L2-like” patterns – or maybe the “Patterns” from serverlessland.com would be amazing – so users do not need to know how to set up IAM roles, connections between API Gateway and Lambda, … manually would make this a much more usable product!
What are your thoughts around the recent announcements of AppComposer? What are your experiences with it?
In this post you will get a short introduction and my personal assessment on how the new Packages component in CodeCatalyst can help you to set up your complete SDLC in Amazon CodeCatalyst.
Only npm supported – a early launch to show what we can expect going forward and to get feedback from users?
With the initial launch Amazon CodeCatalyst allows to manage npm package repositories inside CodeCatalyst. When seing this for the first time I was a bit concerned that this decision – to initially launch with only npm support – will not help a lot, as I expect that organizations would need to store other type of artifacts (jar files, containers, python paackages, …). But I think that at least for Cloud Native Projects that use typescript this will solve the problem of storing artifacts and accessing them natively within CodeCatalyst. Let’s look at how they can be used today.
Using packages repositories in CodeCatalyst
Today you can set up package repositories in CodeCatalyst and connect to upstream (public or private) repositories. You can also change the sort order and the upstream order of the package repositories. The documentation covers the different possibilities to set up repositories very well. You can access the package repositories from your local machine by setting up the connection locally
npm config set registry https://packages.region.codecatalyst.aws/npm/space-name/proj-name/repo-name/
After setting up multiple repositories you can set the order of retrieval and usage. You can also set it up as a “pass-through” repository and allow access to public repositories.
Using packages in CodeCatalyst
Packages in CodeCatalyst are integrated with workflows. You can read or store packages with native actions or by setting up the npm repository manually.
You can also read and publish packages from other systems by using Personal Access Tokens (PAT). The documentation outlines currently supported client commands.
The CodeCatalyst workflows will by default use the set up repositories that you have set up within CodeCatalyst.
What I think we need next in packages
With the launch of the packages component in CodeCatalyst AWS has added a definately missing functionality in CodeCatalyst. Users are not able to store artifacts and share them within a space which makes it possible to create, re-use and deploy immutable artifacts natively within the tool.
This is a much needed functionality, but as I already mentioned, I believe that limiting this to npm packages only limits the use cases for it. I would have expected npm, python and docker support at launch and was a bit disappointed that this was not included.
I do also believe that the “packages” functionality should be better integrated and allow further configuration options, especially when loading/reading packages from upstream repositories – e.g. being able to limit to only certain licences or ensuring that packages included are still “supported” (and regularly updated) or security-scanned.
These type of functionalities would have made the new option “meaningful” and would have empowered developers to build better software too.
I can imagine that we will see python, java and dockersupport pretty soon due to these reasons and it would be great to also support “internal” repositories as “upstream” repositories.
How do YOU think that this new functionality will help you to adapt CodeCatalyst? Please drop me a message on socials or an E-Mail!
In this post you will learn how the new integration of the IAM Identity center with Amazon CodeCatalyst allows to use your own IdP as single source of truth of users for CodeCatalyst spaces. We will look at how you can connect a space to an IdP and on how this can be used to set up certain permissions based on your IdP roles.
Single Sign On (SSO) using IAM Identity Center empowers CodeCatalyst users to use their own IdP to provision user accounts in CodeCatalyst
With the new integration for Amazon CodeCatalyst into the AWS Identity Center organizations can now connect to their own existing IdP (AzureAD, Ping, Okta, …) going through the AWS Identity Center.
Benefits of the new integration
With this new integration users and organizations go to the Space settings in CodeCatalyst and choose to integrate with an existing instance of the IAM Identity Center.
This also connects potentialy to any other IdP that uses the IAM Itentity Center as a proxy. Administrators will only need to manage roles and permissions in on central place. The roles from the IdP can then be mapped to certain team roles in Amazon CodeCatalyst.
What I don’ t like about the new integration
There are two things that I didn’t like when looking at this integration:
Why do we need to go through the IAM Identity Center and cannot allow direct SAML or OIDC integration for a specific space? With the “need” to have an IAM Identity center organizations also need to directly connect to an existing AWS Account to manage connectivity – and this once again brings back a “tooling” account that initially I was hoping to replace with CodeCatalyst.
The second thing that I missed was the possibility to automatically map existing roles to groups in Amazon CodeCatalyst – today this is a – one time – manually effort that needs to be conducted. If you need to do that only once for your organization that isn’t a problem, but if you decide to have multiple spaces for your organization and need to perform this multiple times, then this can be very time consuming.
Summary
I believe that this change will have a very big impact on the adoption for CodeCatalyst as administrators and security teams in organizations will make it easier to allow the usage now that there is a central place to manage identities. And with the possibility to actually try out CodeCatalyst in an enterprise world, I hope that we will also see more adoption of CodeCatalyst and with that also a more streamlined and better communicated roadmap of CodeCatalyst. If you would like to learn more on how to activate this, please refer to the documentation.
In this post you will learn how to build a Custom BluePrints in Amazon CodeCatalyst. You will get to know how Custom BluePrints allow you to generate a consistent setup of your projects and CI/CD workflows and how you can leverage this to empower your teams to be compliant with rules and deployment best practices. AWS has announced this today at his annual user conference AWS re:invent 2023 in Las Vegas.
Custom BluePrints – what they do, why they are there and how you can use them
Custom BluePrints can be seen as “project templates” that you can build and offer to all of your users of a space. As a user of CodeCatalyst you should already be aware of the general concept of a blueprint: It’s a templated project that you can start your software project on.
Custom BluePrints take this concept to a new level: Now you can build BluePrints for your projects! And that’s not it: a project can be depended/generated by multiple BluePrints and a project generated from BluePrints can also become a BluePrint! yey! You do not start from zero and you are now also abled to add a BluePrint to an existing project.
Think about what this means for you and your organization: You can set up certain default workflows, permissions, dependencies, environments, etc. and apply that to all of your new projects by default, without the need to “touch” anything.
And that’s not “it” – there is more: CodeCatalyst also allows you to “update” projects that have been build from a Custom BluePrint!
Think about the scenerio where you ahve over 20 microservices that all follow the same CI/CD pattern, including governance rules and dependencies. They all have the same dependencies and pre-requisites (e.g. AWS account permissions, environment setups, etc.). Now one of the dependencies has a critical, security relevant defect and you urgently need to upgrade all of these projects…
CodeCatalyst Custom BluePrints enables you to do exactly that with just a few clicks and pull request approvals!
I hope you are curious to look at this new functionality in details now, keep reading!
The technology behind blue prints – the power of Projen and Code Generation
Custom Blue Prints are powered by Projen under the hood – to learn more about Projen, please look here. Similar to a projen.rc.ts you will need to create a blueprint.ts file in the src folder of your BluePrint project. There you can then define the rules and automations which will be applied when the BluePrint is used as a starting point for a new project. Currently the Custom BluePrint SDK allows you to define Wizard configurations, Workflows, Environments, Source Repositories, Pre-Configured Dev Environments, … Using Projen as an underying technology the team is able to re-generate the code for your project and create a pull request on your behalf for the source repository of your project i there is changes. And this is great!
Building your first BluePrint
Building your first BluePrint is easy!
Create your BluePrint project
It starts with creating a new Custom BluePrint project in the CodeCatalyst UI using the BluePrint builder. This one can be accessed from the Space “Settings” page. After going through the wizard, this will create a new project for you in CodeCatalyst. In this project, you can now either checkout the source repository into your local IDE or you can use the DevEnvironments to directly get you started to work on the project.
Building and Editing Custom BluePrints can be a HIGH RISK
As you are reading this and as the functionality has only just been announced, it might be early – but it is never too early to warn about this:
If you edit a Custom BluePrint and potentially introduce security problems – maybe even unsecure dependencies – you might expose everyone that uses your BluePrint to challenges.
Better set up additional protections for all of your BluePrint projects!
Edit the sources of your BluePrint Project
Now that you your project is set up, you can start building your own components and parts of your project.
Be cautious to edit package.json in your BluePrint project – you can, but it might break some of the integrations. The typescript project is set up for you to be able to preview and publish your BluePrint.
The main “sources” of your BluePrint and the definitions will be in the src/blueprint.ts file. Initially, the project comes with a simple wizard set up with only a few parameters. It copies only the contents of the static-assets directory when being executed.
I’ve not been able yet to try out a lot of the functionalities and possibilities of the SDK, but still I was able to create a custom BluePrint that can be used to deploy a Flutter Web application with a Serverless Backend.
What I found out is that it will be a huge effort to set up the BluePrint in combination with a Wizard. This is not a 4 hour task, we’re rather talking about a week to get started. Further details on this – see the “Testing” section. This might also explain why this functionality is part of the new Enterprise tier for Amazon CodeCatalyst.
Please read the available options of package.json, but to get you started: use npm run blueprint:synth or yarn blueprint:synth to generate the BluePrint locally.
This will also execute any local unit tests that you have build for your BluePrint.
Testing your Blue Print locally
Using npm run blueprint:synth or yarn blueprint:synth will generate the BluePrint bundle locally and execute unit tests. It will generate a version of your project created by the BluePrint in the folder synth/synth.[options-name]/proposed-bundle/. This will use the default options you provided.
It is also possible to simulate the wizard adding the --cache parameter.
You could also build Unit Tests or SnapShots tests and integrate them into this lifecycle step of the build procedure.
Publishing your BluePrint to the Space Catalog
Use npm run blueprint:preview or yarn blueprint:preview to upload a “preview” version of your BluePrint to your CodeCatalyst space. This will make the Custom BluePrint available but not make it available in the catalog yet, so users cannot use it.
It also automatically increases the version number for your BluePrint.
Testing your Blue Print through the UI
After publishing your BluePrint preview from your local environment, you will now see this preview version within your Space Settings. From there, you are able to create a project out of the Preview version of your BluePrint.
Here you will need to test all options of the wizard and in addition to that verify that the customizations that you added have been correctly generated after you went through the wizard.
I have made the experience that a whole testing cycle can take 3-5 minutes – so I really recommend you to look at local unit tests.
After you have finished your tests, you can add a specific version of your BluePrint to the BluePrint catalog. This is currenty only be possible through the UI in the Space Settings.
Creating (one or many) projects from your BluePrint
Now you are ready to start creating projects from your BluePrint!
Go to the normal “Create Project” screen – after using “Create from Blueprint” you will now have the option sect “Space Blueprints” which is where you will find your newly created BluePrint.
This should now generate your project from your BluePrint and the structure should be as you wanted it to be. 🙂
You can also add additional BluePrints to an existing project – this allows you to incorporate multiple BluePrints in a single project, a combination of multiple “default” project settings.
Please be aware that this will remove manually added or created resources that are part of the BluePrint that you are adding – it will overwrite manual changes that “interfere” with the BluePrints code.
Upgrading your BluePrint
Upgrading your works similar to creating it – upload a new “Preview” version, add the new version to the catalog.
Upgrading your projects to a new BluePrint version
You can currently update the used Blue Print vesion for a project by going to the project settings, to the Blue Prints section there and then by loading up one BluePrint. Choosing to upgrade to a different or newer version will generate the proposed changes and make them visible to you before you apply them.
What’s next for Custom BluePrints?
Oh wow, this is one of the new features that I am most excited about for CodeCatalyst! There is so much potential! I have to explore further the possibility to have multiple BluePrints attached to a project, the possibility to remove a BluePrint from a project, and all of the other things that I didn’t touch yet.
Here’s stuff that I would love to get for Custom BluePrints:
auto-apply updates to ALL projects that are from the same BluePrint automatically
share Custom BluePrints with other Spaces
a Custom BluePrints market place where developers (like me) can put “their” BluePrints in and organizations can “buy” a BluePrint from
I also believe that the team needs to work a bit more on the developer experience when building Custom BluePrints, e.g. by pre-suggesting automated integrated tests (integration or snapshot tests). Publishing a new version to the catalog should also visualize the changes that are going to be added to other projects before you actually publish the new version.
I am a bit disappointed that the “free tier” does not give you the possibility to try out this functionality by being able to add one or two Custom Blue Prints to your space, but maybe this is something that will be possible as soon as the Blueprint SDK is stable.
What do you think of Custom BluePrints? What are your main wishes? Please reach out to me and let me know!
Both Christian and I have been writing about our “Football Match Center” project – and as part of this project we obviously also needed a CI/CD (Continuous Integration and Continuous Deployment) pipeline. Our aim was to be able to integrate changes that we do regularly and see commits to the main branch being directly and automatically deployed to our environments.
I will first try to define some pre-requisites and then talk about learnings and experiences.
What is a mono-repo
A mono-repo is an abbreviation of a “mono repository” which I understand as being a single repository, where different microservices or components are stored and saved in the same git repository. This can be various different services, infrastructure or user interface components or backend services.
A mono-repo has special requirements when building the CI/CD pipeline.
Expectations for our CI/CD pipeline
For our CI/CD pipeline we wanted to be able push changes to production quickly and be able to iterate fast. We wanted to achieve 100% automation for everything required for our project. As we have been writing, we completely develop this project using Amazon CodeCatalyst and thus the pipeline also should be build using the Workflows in CodeCatalyst.
Going forward we want to ensure that the pipeline also includes all CI/CD best practices as well as security scans and automated integration or end to end tests.
How to structure your pipelines
In this article we will purely focus on the CI/CD pipeline for your “main” or “trunk” branch – the production branch that will be used to deploy your software or product to the production environment.
We will not consider pipelines that should be executed on feature branches or on pull request creation.
The “one-pipeline-to-rule-them-all” approach
In this approach all services are deployed within the same pipeline. This means that there is only a single pipeline for the “main” branch. All services that are independed rom each other can deployed in parallel, services that have a dependency need to be deployed one after another. Dependencies or information from one to another service can be pushed through the pipeline using environment variables.
This can lead to longer deployment/execution timelines but ensures that “one commit” to this “main” branch is always deployed completely after a commit. If tests are included in the pipeline, they will need to cover all aspects of the application.
The “context-specific” or “component-specific” approach
Different components or contextes get a different pipeline – which means that e.g. the backend-services are deployed in one pipeline and the frontend-services in a different pipeline.
In this approach, you automate the deployments for components and need to ensure that, if there are dependencies between the components, the pipeline verifies the dependencies. If one component requires information from another one you need to pass these dependencies using other options.
This can lead to faster iteration cycles for specific components but increases the complexity of the pipeline dependencies. You can also do not directly see if a specific commit has been deployed for all components or not.
The “one-pipeline-for-each-service” approach
This is the most decoupled option for building a CI/CD pipeline. Each service (lambda function, backend, microservice) gets its own pipeline. For each service, you can implement service specific steps as part of the pipeline.
One of the main requirement for this is that the services are fully decoupled, otherwise managing dependencies can get very difficult. However, this allows a very fast iteration and development cycle for each microservice as the pipeline execution for each service is usually very fast.
The pipeline needs to verify the dependencies for each service as it executes the deployment.
Football Match Center – our experiences with building our CI/CD pipeline in Amazon CodeCatalyst
For our project we decided to start with a “mono-repo” – in our case today, we have a CDK application (written in Typescript) that describes the required infrastructure and includes Lambda functions (where required) and a user interface which is written in Flutter.
From a deployment perspective, the CDK application needs to be deployed on AWS and the Flutter application then needs to be deployed on a S3 bucket to serve as a Single Page Application (SPA) behind Cloudfront. Obviously this deployment/upload has the pre-requisite of the S3 bucket to be already available.
How we started
We started, very classic, with the “one-pipeline-to-rule-them-all” approach. We had one single pipeline that was used to deploy all services that are part of the infrastructure.
This pipeline started with “cdk synth” using the “CDK deploy” action in CodeCatalyst and then had other steps that depended on the first one – to executing the “flutter build” and later the “UI deploy” (using the S3 deploy action).
In this first version, the CDK deploy step had variables/output with the name of the S3 bucket and the CloudFront distribution ID passing it it to the next step where the output of “flutter build” was then uploaded and the CloudFront distribution invalidation request was triggered.
In this approach a commit to the “main” branch always triggered the same pipeline and this pipeline deployed the complete application.
We also used only natively available CodeCatalyst actions for deployment – “cdk deploy” and “build”. For the Flutter action we used a Github Action for flutter.
Experiences and pipeline adjustments
With this approach we had the problem that the Flutter build step took ~8 minutes and blocked a new iteration of changes in the CDK application or the lambda function. Thus, this slowed down our development cycle.
In addition to that we found out that there was no possibility to influence the CDK version with the CDK deploy action – but we wanted to be able to use the version defined in our Projen project – to be able to deploy to development environments from our local with the same version as from the CI/CD pipeline.
Both of these findings and experiences brought us to implement some changes to the pipeline:
We separated the UI build from the CDK build
We moved away from using “cdk deploy” and replaced it with a “build” step – to be able to trigger “projen” as part of the pipeline
So now we have two pipelines:
CDK deployment
Triggered on changes to the “cdk-app/*” folder
Executing CDK synth, build and deploy steps – but not using the “cdk deploy” action but a normal build step instead
We adjusted the CDK app to include Cloudformation exports that exports the S3 bucket name and the Cloudfront distribution ID
Ui deployment
Triggered on changes to the “ui/*” folder
Reads the values for the S3 bucket and the CloudFront distribution ID from the CloudFormation exports using the AWS cli
Executing the Flutter build steps and the S3 deploy action
These changes reduced in faster iterations for the development cycle of the CDK app and allowed decoupling the backend from the UI part. We were also able to fix the CDK version to the version we have selected in Projen.
In our project we have chosen the “context-specific” approach for the pipeline.
My recommendations for building CI/CD pipelines for a mono-repo
Our CI/CD pipeline is not perfect yet and we’re yet to add some important things to our pipeline.
From the experiences we have made I am still not convinced that our “context-spefic” approach is the right path.
As of writing this post in early April 2023 I’m inclined to move towards a model where we combine the “context specific” and the “one-pipeline-to-rule-them-all” approach: context-specific for “lower”, non production environments and then a single pipeline that does the promotion to our production environment.
Today we do not yet have a production environment, so we did not answer that question yet 🙂
How do you solve this challenge around building CI/CD pipelines for mono-repos?
As Amazon CodeCatalyst is still in Preview, it has only limited integration possibilities with other AWS services or external tools. Sending notifications from a Workflow execution is something that I believe is critical for a CI/CD system – and as I focus on CI/CD at the moment I’ll focus on the notifications on Workflows in this article.
What kind of notifications do I need or expect?
As a user of a CI/CD and Workflow tool there are different levels of notifications that I would like to receive:
Start / End and Status of Workflow execution
State / Stage transitions (for longer running workflows)
Approvals (if required)
In addition to that, based on the context of the notification I would like to get context-specific information:
a) For the “Start” event I would like to know who or which trigger started the workflow, which branch and version it is running on, which project and workflow has been triggered. If possible getting the expected execution time / finish time would be good b) For the “End” event I would like to know how long the execution took and if it was successful or not. I would also like to know if artifacts have been created or if deployments have been done. If the “End” is because of a failure, I would love to know the failure reason (e.g. tests failed, deployment failed, …) c) For the state transitions I’d love to know the “time since started” and “expected completion time”. I would also like to, obviously, know the state that has been completed and the one that will now be started. d) For approvals I’d love to be able to get the information about the approval ask and all required information (commit Id, branch) to do the approval
What does CodeCatalyst Support today?
Right now CodeCatalyst allows to set up notifications to Slack. Please see details on how to set this up here. This notifications are also minimal right now:
In Slack this looks like this:
How can I enhance the notification possibilities?
Luckily one of the “core actions” is the possibility to trigger a Lambda function and this is what we are going to use here to be able to trigger advanced notifications using Amazon SNS. In our example we are going to use this to send an eMail to a specific address, but you can also use any other destinations supported by SNS like SMS or AWS ChatBot.
Setting up pre-requisites
Unfortunately we will need to set up an SNS topic and a Lambda function in a dedicated AWS account in order to use these advanced notifications. This means that we are “breaking” the concept of CodeCatalyst not requiring access to the AWS Console, but this is the only way that I found so far to be able to send additional notifications.
Ideally we would be setting up the SNS topic and the lambda function using CDK, but that increases the complexity of the workflow and of the setup and because of that I’m not including that in this blog post.
Setting up the SNS topic
Please create a SNS topic following the AWS documentation through the console. We assume the topic to be in “eu-central-1” and the name to be “codecatalyst-workflow-topic“.
You can follow this blog post to manually set up the lambda function through the AWS console, please ensure to give the Lambda functions permissions to use the SNS topic. The required code using Python will look like this:
Obviously the same can be achieved using Typscript, Go or any other supported function. Please adjust the topic_arn to match the topic that you just created. After creation this Lambda function will now have an ARN which should look similar to this: arn:aws:lambda:eu-central-1:<accountId>:function:send-sns-notification-python
We will need this ARN when setting up the notification in our Workflow.
Integration into the workflow
Integrating this Lambda function into a workflow is easy:
As you can see, we are integrating an “aws/lambda-invoke@v1” action which then points to the lambda function that we just created.
In the “RequestPayload” we are passing a few information to the Lambda function which will then be passed to the SNS topic as part of the message. This is how the message will look when received as eMail:
Missing information and next steps for enhanced notifications
As you can see we are able to send notifications from CodeCatalyst to multiple targets, including eMail with this option.
What we are missing is – and I am not sure if thats possible or not – is all of the “metadata” of the workflow execution like:
Workflow-Name
State-Name
Project Name and additional information
In the documentation I was not able to find out the available environment variables about these information…. If you do have any ideas on how to access this metadata, please let me know!
At re:Invent 2022 AWS announced Amazon CodeCatalyst and as you might have read on my blog or seen on my YouTube Channel I have been playing around with the service a lot. A few days ago, Brian asked me a few interesting questions, one of them being:
What’s the diff between CodeCatalyst and AppComposer?
Lately we had a Community Builders session with the Amazon CodeCatalyst team and similar questions came up in regards to comparing CodeCatalyst with other, already existing services.
And to be honest, the amount of AWS services that are related to building, managing or deploying software projects on AWS has grown a lot in the last years and it gets difficult to keep an overview of how these services play together and which tool has which functionality.
In this post we are aiming to compare and place CodeCatalyst in relation to other (new or already existing) AWS Services. We are also going to look at missing functionalities that are currently available in other services but not in CodeCatalyst.
Please be aware that these are all our personal opinions and based on our own understanding – some of it being assumptions.
This post was Co-Authored with AWS Community Hero Brian Tarbox – Thanks for your support!
AWS Services that we are going to compare CodeCatalyst with:
Amplify was released at re:Invent 2018 and has since then been improved gradually.
Amplify is a complete solution that lets frontend web and mobile developers easily build, ship, and host full-stack applications on AWS, with the flexibility to leverage the breadth of AWS services as use cases evolve.
With that AWS positions Amplify as a service that is able to reduce the heavy lifting on web or mobile developers that want to get started on AWS. AWS has extended Amplify into being a service that offers nearly all building blocks required as part of your SDLC process. It does not offer source code repositories, but CI/CD capabilities. You are able to configure the CI/CD pipeline and also provide your own build images. With the release of Amplify Studio in 2021 AWS extended the capabilities to include a “No-Code/Low-Code” capability that allows rapid-prototyping for web and mobile applications. The target audience for Amplify are Front-End and Mobile developers with no to minimal experience on AWS.
Application Composer
This is a new AWS service announced at re:Invent 2022 mainly focused on “rapid prototyping” helping you to quickly “paint” serverless applications – build our your architecture out with visualizations, Application Composer will create the required “starting code” (Cloudformation, but also Lambda code) in the background. As output you get a project in code that you can then commit to a Git repository or deploy out to AWS. Application composer enables Serverless developers to quickly prototype serverless applications and convert them into code that can then be used as a starting point for your project. Application composer does not provide Source Code management or CI/CD capabilities.
The service, which reached GA on March 8th of 2023, points at developers starting new serverless projects that quickly want to get both an architecture diagram as well as a starting point for further developments.
App Runner
This is a AWS service announced in 2021 and it can be used to build, deploy and run web applications based on containerized workloads. It allows you to stay focused on your application with the service taking responsibility to provision and host your application. It also takes care of creating a container from your source code. You can connect App Runner either to your source code management system or to a container registry.
Beanstalk
This is one of the “ancient” AWS services – it was announced in 2011 and has since then been around. In the community I have more than once heard that “Beanstalk is dead” and not being actively developed anymore, but still – it works and can be used to provision your web applications. At the same time, you will still be able to access the infrastructure that is required to host your service. The “message” is similar to App Runner – it helps developers to focus on writing business code and ignore the deployment strategy. Beanstalk supports Java, .NET, PHP, Node.js, Python, Ruby, Go and Docker web applications. In order to use Beanstalk, you will need to upload a source bundle – it is not possible to connect beanstalk automatically to a Git repository, but you can update the source bundle automatically using APIs.
We treat these services in one group as they belong together from a strategic point of view. They have been around for a few years and the teams that built these are now involved in CodeCatalyst. CodeCatalyst partly uses them “under the hood”. CodeCommit is a managed git hosting, CodeBuild is a managed “build” system, CodeStar is a “project management” tool. CodePipeline allows combining multiple CodeBuild steps to form a pipeline. CDK Pipelines integrate with CodePipeline today. With CodeArtifact users are able to store artifacts and software packages.
All of these services are tied to a specific AWS Account and live within the AWS Console. This has forced organizations and AWS customers to create “toolchain accounts” that centrally host these services. These tools might be considered as building blocks rather than a full solution.
CodeCatalyst
As we are comparing the other services with CodeCatalyst, we also need to define what CodeCatalyst is: a new AWS service announced at re:Invent 2022 that will cover the full lifecycle of product development on AWS, starting from the source up to the deployment part. It is an “All-in-one” solution to help you build software on AWS efficiently. You can manage your planning and issue tracking in it as well as your source code and your CI/CD workflows. I have a few introduction videos recorded available on YouTube. CodeCatalyst lives “off” the AWS Console and this means that you do not need to be logged in to use it – and it can access multiple AWS accounts by an integrated authorization process.
Proton
This is a AWS service announced in 2020 – and AWS describes Proton as a service to allow central teams to build and provide central infrastructure components that can easily be shared with users while at the same time maintaining the integrity of the deployed infrastructure. With that, the tool is focused on infrastructure provisioning (=deployment) pipelines. Proton allows the central “platform team” to provide templates to be used by application teams – with only minor changes or configurations to it.
Which problem(s) does CodeCatalyst address?
CodeCatalyst addresses the need of developers or of development teams that need to cover all parts of the product life cycle or parts of it with a tool natively built on AWS. It can be used for issue management and planning as well as source code management. It has natively built CI/CD capabilities with workflows for Continuous Integration and Deployment. CodeCatalyst offers an opinionated solution for addressing software development best practices on AWS. It also allows online-editing of source code with the Dev Environments and supports the management with reports on resources and workflows managed as part of CodeCatalyst.With Blue Prints it allows developers to quickly start a new project and reduces the time to get a new project started. It can be seen as an opinionated approach to development.
So, how does CodeCatalyst relate to the other services?
Out of the six services we looked at, a few can at first glance not compete or be compared with CodeCatalyst as they target a different audience or address different problems as CodeCatalyst:
Proton – does not help with building or deploying code, it is targeted towards “composing” an application from various pieces. As such, it might be part of a solution but not the whole solution
Application Composer – while this service can be used to do a rapid-prototyping for serverless architectures, it does not allow source code management or deployment of the built architecture. I hope that we will see Application Composer as a new option for starting off a new project in CodeCatalyst going forward
Beanstalk – is not a “developer focused” tool as it comes with pre-build environments and CI/CD pipelines and expects you to manage the source code externally
Based on this, the services we want to look at in more details are:
While Amplify allows to build CI/CD pipelines and manage deployments for both Front-End and Back-End components of an application, the pipelines and deployments are limited to the services supported by Amplify and the capabilities of the automatically generated CI/CD pipeline. There is not much flexibility to adjust the pipelines. In addition to that, Amplify does not allow you to store your source code or to manage your software project. It has no build-in issue management or tracking system.
With Amplify Studio and the corresponding tutorials you get the possibility to quickly get started on specific use cases. This is not as flexible as the CodeCatalyst Blue Prints but gets you started pretty quickly. Amplify Studio is awesome as a “low-code”, getting you started tool – it allows you to quickly build full-stack applications through a User Interface and for that use case it is definitely better than CodeCatalyst. At the Berlin Summit in 2022 I attended a Live Demo of Rene Brandle and was amazed by the functionalities.
Amplify Studio lives “outside” the AWS Console in the same way as CodeCatalyst and it also requires an AWS account to be connected for deployments. Each Amplify project can be connected to one AWS account. This is more flexible in CodeCatalyst.
Still, Amplify misses a lot of things that are required for an end-to-end “DevOps” tool to manage all processes and requirements of an agile software development project.
Comparing CodeCatalyst to the Code* services (CodePipeline / CodeCommit / CodeBuild / CodeStar / CodeArtifact) feels a bit like comparing a Tesla Model 3 with Karl Benz’ Patent-Motorwagen 🙂
The Code* services feel complex to use, although they provide similar functionality than CodeCatalyst if you combine them together. They are “building blocks” that you as a developer can use to build “your own version” of an integrated Developer Toolchain.
In addition to that they live in a specific AWS account, as mentioned above, which makes the handling of access complicated and requires you to have an IAM user that is allowed to access them.
The user interface and possible integrations are minimal and feel “developer unfriendly”. CodeCommit has the CodeGuru Reviewer integration which is currently not available in CodeCatalyst.
CodeBuild (and with that CodePipeline) is very slow in bringing up new, fresh “build instances” – so starting a new pipeline execution can take minutes which is bad for developer productivity. This is something that CodeCatalyst is addressing with the “lambda” execution environment.
Summary, takeaways and our wishes
As per the messaging, blog posts and announcements from AWS around CodeCatalyst, we believe that the service today aims to offer an opinionated tool for development teams that want to practice “You build it, you run it” – in line with the DevOps mentality. It also means that AWS shows the courage to not only give builders a tool at hand but also “influences” what they build with Blue Prints that include best practices. The vision for CodeCatalyst however could be even more than that: a tool, powered by KI capabilities that empowers builders to efficiently develop and build high quality software by reducing the manual work and efforts through automation.
However, CodeCatalyst is not yet there and it’s going to take some time and effort from the team to reach this.
Wishes for Developer Tooling in General
This post has shown that AWS offers a lot of different possibilities to handle software projects on AWS. We made clear that all of the available tools serve a different purpose and target a different audience. While Amplify focusses on Web or Mobile developer and Application Composer targets Serverless developers, Code Catalyst takes a more generalist approach.
Overall, the “Developer Tools” landscape on AWS needs:
More and better guidance on WHEN to use WHICH service
Better “HOW TOS” instead of hard-to-read documentation or specification
Wishes for CodeCatalyst
Compiling a wish-list for CodeCatalyst can be a big effort as there are still a lot of features that we would like to see. We’ll touch on a few ones here:
General
Single Sign On without Builder ID – Okta/Ping/etc.
Other regions support
Allow “Open Source” projects
Issues / Tracking
Epics
Roadmap / Timeline
Integration with Workflows & Automation
Source
Import projects from Git providers
Automations on Pull Request
CodeGuru
Security Review
Best Practice Review
Support of pre-commit hooks when editing online
Verifications, linting, etc. automated
Workflows
More triggers (e.g. by PR, by schedule, by API)
Conditional Steps
Manual approvals
App Store / Play Store deploy actions
Projen Action
Better integration with AWS services
Import existing CodePipelines
Pipeline as Code – CDKPipelines like option to create workflows from code
What wishes do YOU have for Code Catalyst? What is your “most hated” or “most loved” feature today?